
You’re halfway through your day when you feel that dreaded snag—a deep crack in your perfect manicure that threatens to tear off completely. A broken nail isn’t just an eyesore; it can be painful, especially if it splits into the quick, and a salon visit isn’t always an immediate option. Fortunately, you can learn how to fix a broken nail with a tea bag using a simple household method that professional technicians have whispered about for years. This comprehensive guide will teach you the legendary ‘tea bag hack’ to reinforce your nail, providing a durable, invisible repair that lasts for weeks.
1. Why the Tea Bag Method is the Ultimate Emergency Nail Repair
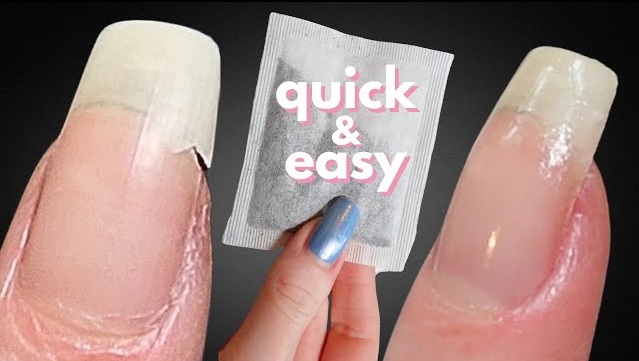
When you face a sudden crack, your first instinct might be to reach for a file and cut the nail short. However, the tea bag method offers a sophisticated alternative that saves your length and prevents further pain. This technique relies on the science of fiber reinforcement, where the fine mesh of the tea bag acts exactly like a professional silk wrap. By embedding these fibers into a layer of adhesive, you create a composite material that is remarkably strong yet flexible enough to move with your natural nail.
The Science of Fiber Reinforcement
Specifically, the paper used in traditional tea bags consists of long, interlocking cellulose fibers. When these fibers absorb nail glue, they transform into a rigid structure that bridges the gap of a fix cracked nail scenario. This bridge distributes the mechanical stress across a wider surface area rather than letting it concentrate on the fracture line. Consequently, the repair prevents the crack from traveling deeper into the nail bed, which is crucial for long-term health.
Cost-Effectiveness and Accessibility
Moreover, this method is incredibly cost-effective compared to professional salon repairs or expensive acrylic overlays. A single tea bag costs mere pennies and can provide enough material for dozens of repairs. While a salon might charge twenty dollars or more for a single nail fix, you can achieve similar results at home with items already in your pantry. This makes it the ideal solution for late-night emergencies when shops are closed or when you are traveling.
Versatility for All Nail Types
Notably, the versatility of this hack extends beyond just natural nails. You can also use it as a broken acrylic nail fix if the enhancement has developed a hairline fracture but hasn’t fully detached. The thinness of the tea bag paper ensures that the repair remains low-profile, preventing the bulky look often associated with home repairs. Furthermore, paper fibers are vastly superior to using scotch tape or other household adhesives, which lack the porous structure needed to bond permanently with nail glue.
Why Paper Beats Synthetic Alternatives
In fact, many people mistakenly try to use plastic-based tapes, but these often peel away within hours. The organic nature of tea bag paper allows the glue to penetrate through the material, creating a singular, unified layer. As a result, the patch becomes part of the nail rather than just sitting on top of it. This deep integration is what allows the repair to withstand daily activities like typing, washing dishes, or exercising without failing.
2. Preparation: What You Need to Fix a Cracked Nail
Before you begin the repair process, gathering the right tools is essential for a seamless finish. Not all tea bags are created equal, and choosing the wrong material can lead to a lumpy or weak repair. You should look for traditional, cheap paper tea bags rather than the modern “pyramid” style bags made of plastic mesh. The plastic versions do not absorb glue correctly and will likely slide off the nail surface before the adhesive sets.
Choosing the Right Adhesive
Additionally, the choice of adhesive is a critical safety consideration. You should always prioritize high-quality nail glue, which is formulated to be body-safe and flexible. While some DIY enthusiasts suggest super glue, it can be overly brittle and may cause irritation to the surrounding skin. According to Wikipedia’s entry on cyanoacrylate, different formulations have varying levels of toxicity and heat generation during curing. Therefore, using a product specifically designed for cosmetic use ensures you don’t damage your natural keratin layers.
The Essential Toolkit
To achieve a professional-grade fix cracked nail result, you will need a few specific items. First, ensure you have a pair of very sharp embroidery scissors or cuticle nippers for precise cutting. You will also need a fine-grit buffer (around 240 grit) to smooth the edges of the patch later. A pair of tweezers is highly recommended for positioning the small piece of paper without getting glue on your fingertips. Finally, have a clear base coat ready to seal the entire repair once the glue has dried.
Sanitization and Safety
Most importantly, you must sanitize the area before applying any glue or paper. Trapping bacteria under a patch can lead to “greenies” or fungal infections, which are difficult to treat. Use a lint-free wipe soaked in 70% isopropyl alcohol to thoroughly clean the nail and the surrounding cuticle area. Specifically, pay attention to the crack itself, ensuring no dirt or oils remain inside the break. This step guarantees the best possible adhesion and protects your long-term nail health.
Setting Up Your Workspace
Meanwhile, prepare your workspace by laying down a paper towel to catch any glue drips. Nail glue can be notoriously difficult to remove from furniture or clothing, so caution is necessary. Cut a small square of the tea bag paper before you open the glue bottle to minimize the time the adhesive is exposed to air. Having everything within reach allows you to work quickly, which is vital since nail glue often sets in under thirty seconds. Proper preparation turns a stressful situation into a manageable, three-minute task.

3. Step-by-Step: How to Fix a Broken Nail With a Tea Bag
Now that your tools are ready, it is time to perform the repair. The key to a successful how to fix a broken nail with a tea bag procedure is patience and precision. If you rush the layers, you may end up with a visible bump that catches on your hair or clothes. Follow these steps carefully to ensure the patch is both strong and invisible to the naked eye.
Step 1: Cleaning and Prepping
Start by removing any existing nail polish with an acetone-free remover. Once the nail is bare, use your alcohol wipe to dehydrate the surface. This removes natural oils that might prevent the glue from sticking. If the crack is jagged, very gently file away any protruding bits that might prevent the paper from laying flat. However, do not over-file, as you want to keep as much of the natural nail structure as possible.
Step 2: Measuring and Cutting
Next, take your tea bag and cut a small rectangular piece that is slightly larger than the crack. It should cover the entire length of the split and extend about two millimeters onto the healthy part of the nail. For a broken acrylic nail fix, you might need a slightly larger patch to handle the extra weight of the enhancement. Ensure the edges are straight, as jagged edges are harder to buff out later. Try to handle the paper with tweezers to keep it free from skin oils.
Step 3: Applying the First Adhesive Layer
Apply a thin, even layer of nail glue directly over the crack. Do not use too much; a single drop spread with the nozzle is usually sufficient. While the glue is still wet, use your tweezers to place the tea bag patch over the break. Press it down gently with the flat side of the tweezers or a wooden cuticle stick to ensure there are no air bubbles. The paper should become translucent almost immediately as it soaks up the adhesive.
Step 4: Positioning for Integrity
Specifically, ensure the patch is centered over the break. If the crack is at the side of the nail (a “sidewall” break), wrap the paper slightly around the edge of the nail. This provides 360-degree reinforcement, which is much stronger than a flat patch. As a result, the repair will act like a splint, holding the two sides of the nail together. Wait about sixty seconds for this first layer to dry completely before moving forward.
Step 5: Sealing and the Double-Layer Technique
Once the first layer is dry, apply a second thin layer of glue over the top of the paper. For deep cracks, you may want to apply a second, smaller piece of tea bag paper directly over the first one. This “double-layering” significantly increases the structural integrity of the repair. However, make sure the second piece is smaller than the first to avoid creating a steep ledge on the nail surface. Let this final layer of glue cure for at least three minutes.
Step 6: Buffing for a Seamless Finish
Finally, use your fine-grit buffer to smooth the edges of the patch. Use light, circular motions and avoid filing the natural nail around the repair. You want the transition between the paper and the nail to be completely smooth to the touch. Once you can no longer feel the edge of the patch with your finger, wipe away the dust with alcohol. Finish with a layer of ridge-filling base coat or your favorite colored polish to hide the repair entirely.

4. How to Repair a Split Nail at Home When It’s Deep
Dealing with a deep split requires a different level of care than a simple surface crack. If you are learning how to repair a split nail at home when the break reaches the nail bed, safety must be your first priority. A deep break often involves broken skin, which increases the risk of infection if not handled correctly. In these cases, the tea bag method serves as a protective bridge rather than just a cosmetic fix.
Assessing the Damage
First, assess whether the area is bleeding or if the “quick” is exposed. If there is active bleeding, you must stop the flow and disinfect the area before applying any adhesives. Never apply nail glue directly into an open wound, as this can cause intense pain and chemical burns. Instead, clean the area with an antiseptic and wait for a scab to form before attempting a tea bag repair. If the pain is throbbing or the area is hot to the touch, you should seek professional medical advice.
Pain Management and Antiseptics
Moreover, for deep splits that are painful but not bleeding, you can use a tiny amount of antibiotic ointment on the very center of the crack. Then, apply the tea bag patch only to the surrounding hard nail tissue to “bridge” the gap without irritating the sensitive skin underneath. This creates a hard shell that prevents the nail from moving and causing further pain. Specifically, this method allows the nail to grow out safely until the break reaches the free edge where it can be safely trimmed.
When to See a Professional
Notably, there are times when a DIY fix is not enough. If the nail is hanging by a thread or if the split extends more than halfway across the nail bed, a professional nail technician or dermatologist should intervene. They have access to medical-grade resins and silk wraps that provide superior strength. Furthermore, if you notice any signs of pus, extreme redness, or spreading discoloration, abandon the home repair immediately. Safety should always come before saving a manicure.
The Tea Bag as a Temporary Bridge
In fact, many people use the tea bag method as a temporary measure to get through a work week or a special event. Even a deep fix cracked nail can be stabilized for 5-7 days with proper application. During this time, the patch acts as a shield, preventing the nail from catching on fabric, which could rip the nail further. By providing this stability, you allow the natural healing process to occur without constant re-injury. As the nail grows, you can gradually trim away the damaged portion.
5. Maintenance and Longevity: Making Your Repair Last
Once you have successfully applied your patch, you likely want to know how long it will hold up. In 2026, with modern high-bond nail glues, a well-executed tea bag repair can last anywhere from one to two weeks. However, its longevity depends heavily on how you treat your hands in the days following the fix. Because the patch is made of organic fibers, it can eventually break down if exposed to excessive moisture or harsh cleaning agents.
Daily Care Tips
To extend the life of your how to fix a broken nail with a tea bag repair, you should wear gloves when doing chores. Specifically, dish soap and laundry detergents are designed to break down oils and proteins, which can weaken the glue bond. Additionally, avoid using your repaired nail as a tool for opening soda cans or peeling off stickers. Treat the repaired nail with extra care, as the mechanical strength of the patch is still slightly less than that of an intact natural nail.
Painting Over the Patch
Fortunately, you can absolutely paint over the tea bag patch. In fact, applying polish actually helps protect the repair by adding an extra layer of defense against water. When applying polish, start with a thick layer of ridge-filler or a strengthening base coat. This fills in any microscopic textures left by the tea bag fibers, ensuring a smooth color application. If you use gel polish, the UV-cured top coat will provide even more structural support, potentially making the repair last until your next fill.
Weekly Maintenance Routine
Meanwhile, you should inspect the patch every few days for any signs of lifting at the edges. If you notice the paper starting to peel, do not pull it. Instead, lightly buff the lifted area and apply a tiny drop of fresh glue to reseal it. This proactive maintenance prevents water from getting trapped under the patch, which could lead to bacterial growth. Contact Luxury Nails & Spa for the latest trendy nail designs if you decide you want a professional to take over the maintenance of your look.
Reinforcing During Manicures
Furthermore, each time you change your nail polish, you can add a fresh layer of top coat or glue to the patch. This “refresh” keeps the fibers saturated and strong. As the nail grows out, the patch will move toward the tip of your finger. Eventually, you will be able to simply file the patch away as you shorten your nails during your regular routine. This gradual transition is the safest way to handle a break without losing your desired nail length.
6. Removal and Aftercare: Protecting Your Natural Nail
Eventually, the day will come when the break has grown out enough to be removed, or the patch needs replacing. The most important rule of removal is to never, under any circumstances, rip or peel the tea bag off. Because the glue bonds the paper fibers directly to your nail cells, peeling will take layers of your natural nail with it. This leads to thinning, sensitivity, and makes the nail more prone to future breaks.
The Acetone Soak Method
Instead, use the safe acetone soak method to dissolve the adhesive. Soak a small piece of cotton ball in pure acetone and place it directly over the patch. Wrap the fingertip in aluminum foil to trap the heat and prevent the acetone from evaporating. After about ten minutes, the glue should be soft enough that the tea bag paper slides off with gentle pressure from a cuticle stick. If it doesn’t come off easily, soak it for another five minutes rather than forcing it.
Post-Repair Nail Recovery
After the patch is removed, your nail may feel slightly dry or look white from the acetone. This is the perfect time to focus on recovery and hydration. Apply a high-quality cuticle oil containing vitamin E or jojoba oil to the nail and surrounding skin. Specifically, massage the oil into the matrix (the base of the nail) to stimulate healthy new growth. Using a dedicated nail strengthener for a few weeks can also help rebuild the keratin bonds that were stressed during the break.
Tea Bag vs. Professional Silk Wraps
Notably, while the tea bag hack is excellent for emergencies, it is essentially a DIY version of a professional silk or fiberglass wrap. Professional wraps use a finer, medical-grade mesh that is even more invisible and durable. If you find yourself frequently needing to repair a split nail at home, it might be worth investing in a professional wrap kit. However, for the occasional snag, the tea bag remains the most accessible and reliable tool in your beauty arsenal.
Final Thoughts on Nail Health
In fact, the best way to handle broken nails is to prevent them entirely. In 2026, advancements in nail supplements and protective base coats have made it easier than ever to maintain strong natural nails. However, life happens, and knowing how to fix a broken nail with a tea bag ensures that a minor accident doesn’t ruin your look. By following these steps, you can maintain a flawless manicure and keep your natural nails long and healthy.
The tea bag method remains the most reliable and accessible DIY hack for saving a broken nail. By following the correct preparation, application, and buffing steps, you can create a durable bond that protects your nail while it grows out. Have you tried the tea bag hack? Share your results in the comments or check out our guide on the best nail strengtheners of 2026 to prevent future breaks!

